Projects 
If you are a Quickbooks user, please refer to the Projects for Quickbooks Users
Section.
Overview
Projects in Capriccio Fuzion are comprised of project tasks
and charge numbers. Many project management systems work in a "top-down" manner,
meaning that revenue numbers are entered at the top of the project, and then
broken up and dispersed throughout the work breakdown structure. This is not the
case with Capriccio Fuzion.Capriccio Fuzion is a bottom up application meaning
that data is rolled up from the charge numbers to the project tasks, and the
project tasks to the project, providing your organization real time visibility
of important project information: revenue, hours allocation, burn status, etc.
Creating a New Project
Projects can be found in the “Project Management” group and
are created by clicking the "New" Project icon.
Project Detail
View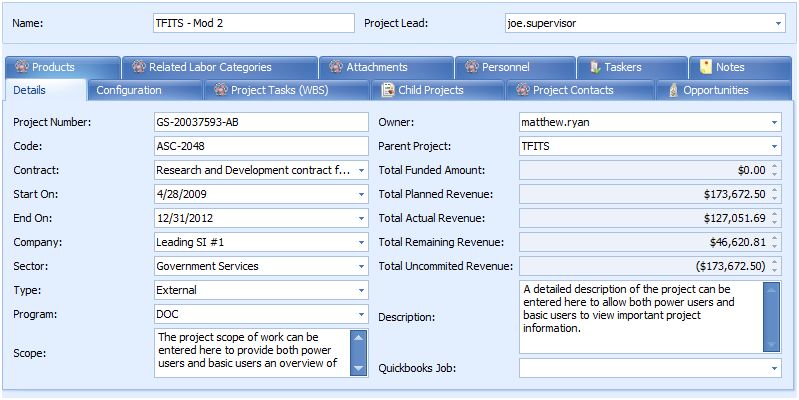
Project Details
There are no required fields on the project "Details"
tab.
All of the revenue numbers are automatically calculated at
this level.We will go into more detail in regards to revenue descriptions and
calculations in theProject
Tasks section of this manual.
Configuration Tab
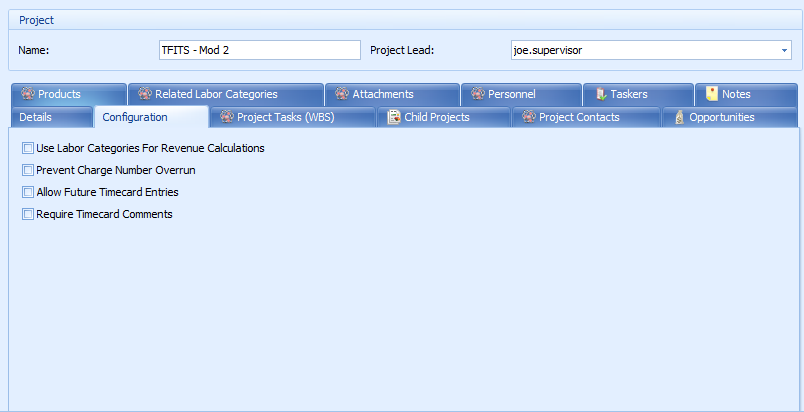
There are 4 controls at the project level:
- Use Labor Categories For Revenue Calculations -Allows labor categories and their respective rates to be used for all revenue calculations.
- Prevent Charge Number Overrun -Prevents users from charging more than their allotted hours on all charge numbers linked to the project.
- Allow Future Timecard Entries - Allows users to create timecard entries in the future for all charge numbers linked to the project.
- Require Timecard Comments - Requires users to enter comments into the
"Comments" field on their timecard before saving the entry.
Creating A New Labor Category
Labor Categories can be created by clicking the "Related
Labor Categories" tab in the project detail view and selecting "New" Labor
Category. Fill in the "Name" field. Click the "Save and Close" icon located in
the ribbon bar at the top of the window (or shortcut on keyboard - "ctrl" and
"enter").
![]() Tip: Once a labor category is created, it can be used on multiple
projects, however you must set the rate for each individual project, as rates
are project specific. Labor categories can also be assigned to a contract
vehicle, to be applied to all projects listed under that contract
vehicle.
Tip: Once a labor category is created, it can be used on multiple
projects, however you must set the rate for each individual project, as rates
are project specific. Labor categories can also be assigned to a contract
vehicle, to be applied to all projects listed under that contract
vehicle.
Assigning A Labor Category To A Project
Click the "Related Labor Categories" tab from the
project detail view. Assign the category by clicking the "New" Labor
Category Project Assignment icon located below the tabs. Select the desired
labor category from the drop down list located in the "Labor Category" field.
Once you have selected the desired labor category, enter the rate you wish to
use for the project,enter the "Start On" and "End On" dates, then click the"Save
and Close" icon located in the ribbon bar at the top of the window (or shortcut
on keyboard - "ctrl" and "enter").
Linking An Employee To a Labor Category On A Project
Click the "Personnel" tab located in the project detail view.
Assign the personnel by clicking the "New" Personnel Project Assignment
icon located below the tabs, select the "User" you wish to assign, select the
"Labor Category" you wish to connect to the user, then click the "Save and
Close" icon (or shortcut on keyboard - "ctrl" and "enter").